
This tutorial by Redmistpete explains how to install the UNIX Uuntu Operating system which is compatible with most PC's Laptops, Notebooks and Netbooks and even some smaller hand-held devices. This operating system will out-perform other popular operating-systems on the same computer.
What is Ubuntu - is it any good?
Ubuntu is completely free, lightning fast, rock solid and practically immune to viruses and hacker threats!
There are thousands of free (full) applications available to download (from music, video, office and games etc) all just a click away in the built-in Ubuntu Software Centre's browser. The openoffice(.)org suite is fully compatible with all documents - including Microsoft documents.
It is ethical software "for the people, by the people". It is constantly being worked and improved by hundreds of thousands of world-wide developers.
The desktop environment is easily customised to suit the users needs with applets such as calenders, weather RSS news streamers, tab previews, slide-shows, task-bars, animated desktops and much more.....Ubuntu will run on even the slowest of computers - revive your ancient, low-powered PC and make your friends jealous with it's amzing 3D desktop effects! Free online support, upgrades and communities are in place to ensure you get the most out of your experience.
This video outlines the comparison between the recent Windows Vista and Ubuntu:
Ubuntu is also capable of running most* windows compatible software without problem using the free "WINE" application. It is also possible to set up a dual-boot system where the user chooses which operating system to boot into from a menu during startup.
Try Ubuntu RISK-FREE!
There are 3 ways to enjoy the rich, safe environment of the Ubuntu operating system:
1- Boot from the disc into a Live session to evaluate the operating system before you install it. No system changes are made at all so this process provides a risk-free assessment of the software.
2- Install Ubuntu from the disc to a harddrive on your computer (or laptop/notebook/netbook) either as a replacement or alongside other operating systems such as XP, Vista, Windows 7, MAC OS etc.
3- Run Ubuntu from within a "Virtual Machine" inside your own operating system, akin to an emulator (eg a Ubuntu desktop running as a program on a Windows XP machine). This method is not preferred as system performance and compatibility issues may arise due to the host softwares limitations.
Installing Ubuntu
To install Ubuntu (Latest Version) using one of the above methods, first download Ubuntu from this link>
http://www.ubuntu.com/getubuntu/download
Burn the image to a disc then boot from the disc and select the appropriate option from the menu (ie Install or Boot Live CD session).
11 January 2010
"Start Menu"
This tutorial by Redmistpete explains how to add GnoMenu which acts as a "Start Button" application to bunch all of your apps, settings, and launchers in one easy, eye-candy place.It can be tweaked with skins, icon sets, buttons and transparency as well as applying any open/close animation from the compiz-fusion library!
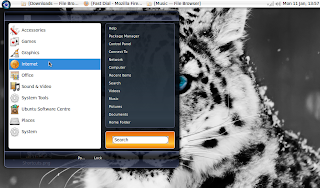
How to add GnoMenu
After Ubuntu 9.10 (Karmic), GnoMenu is pre-installed. If not, get the .deb package for GnoMenu v2.0 or above and install.
1- right-click the panel and select "Add to Panel..." (choose whichever panel you wish to place the Menu on - multiple instances are supported).
2- Scroll down and double-click "GnoMenu"
3- the menu can now be dragged to a convenient place on the panel (it may be necessary to 'unlock' any other items if they are in the way - just right click the and un-check the "Lock to Panel" box)
4- right clicking the GnoMenu icon allows configuration and locking it's position on the panel,
5- left-clicking the GnoMenu icon activates your new 'Start Menu'
'Terminal' improved
This tutorial by Redmistpete explains how to modify the terminal so that the background is tinted to a transparent black while the text is a striking bold white. This allows the terminal to be placed ontop of a webpage or document to copy the commands without obscuring the view - also it looks much better than the default and opaque black on white.

1- first, we'll open the standard terminal - go to 'Accessories>Terminal'
2- next, from the terminal's menu, we'll click 'Edit>Profile Preferences'
3- click 'Background' and select "Transparent Background" and move the slider to the right just past the center
4- Click colours and for "Text" I use 'white' and for "Background" I use 'black'
5- finally, just click 'Close'
9 January 2010
Cairo-Dock!
This tutorial by Redmistpete explains how to add Cairo-Dock which acts as a "Quick Launch" bar on the edge of the screen for the apps you use regularly. In addition, there are many docklet applications to add extra functionality such as an analogue clock, battery monitor (for laptops/netbooks), a weather monitor and a shortcut which displays regularly used devices and folders.
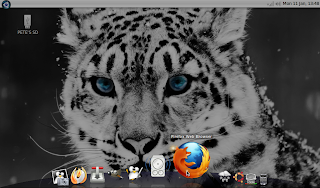
Add Cairo-Dock
1- open the Software Centre (or synaptic if you prefer) and install Cairo-Dock
2- open the session manager (startup programs) from the control centre and add "Cairo-Dock" so she starts up each time you reboot
3- launch Cairo-Dock from 'Accessories>GLX-Dock' (if your computer supports openGL rendering, otherwise click on the no_openGL_cairo-dock version instead)
"Shortcuts"
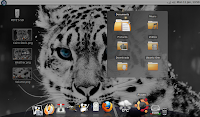
The shortcuts docklet allows the user to quickly jump to a desired device, drive or folder.
1- right-click the dock, go to 'Cairo-Dock>Configure' and put a tick in the 'Shortcuts' box in the 'Desktop' section
2- for neatness, I configured mine to display only folders (not drives or devices)
3- to make the docklet open when the mouse passes over the icon, remove the tick from "Open on Mouse Click" option
Volume Slider
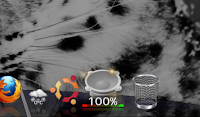
1- right-click the dock, go to 'Cairo-Dock>Configure' and put a tick in the 'Volume' box in the 'Controlers' section (it's French - forgive their spelling)
2- for neatness, I configured mine to display the %volume in the icon itself (rather than above the icon)
3- use the middle mouse wheel/touch-pad to slide the master volume up/down, right mouse-click opens the default sound-mixer
Weather Forecast

This docklet graphically displays the current weather and temperature. It can be expanded to show a short-forecast for the following number of days of your choice (the forecast is dependent on an internet connection and takes a moment to connect to the server after startup or reboot)
1- right-click the dock, go to 'Cairo-Dock>Configure' and put a tick in the 'Weather' box in the 'Accessories' section
2- to get a forecast, you need to ender you region code. US and Canada are automatically searched by entering a State but for UK, either search weather sites/google for your code or just experiment; UK codes will be in the format of either UKxx0001 or GBxx0001 and will run alphabetically by City
3- for neatness, I configured mine to display only 3 days in the forecast
Subscribe to:
Posts (Atom)