
This tutorial by Redmistpete explains how to install the UNIX Uuntu Operating system which is compatible with most PC's Laptops, Notebooks and Netbooks and even some smaller hand-held devices. This operating system will out-perform other popular operating-systems on the same computer.
What is Ubuntu - is it any good?
Ubuntu is completely free, lightning fast, rock solid and practically immune to viruses and hacker threats!
There are thousands of free (full) applications available to download (from music, video, office and games etc) all just a click away in the built-in Ubuntu Software Centre's browser. The openoffice(.)org suite is fully compatible with all documents - including Microsoft documents.
It is ethical software "for the people, by the people". It is constantly being worked and improved by hundreds of thousands of world-wide developers.
The desktop environment is easily customised to suit the users needs with applets such as calenders, weather RSS news streamers, tab previews, slide-shows, task-bars, animated desktops and much more.....Ubuntu will run on even the slowest of computers - revive your ancient, low-powered PC and make your friends jealous with it's amzing 3D desktop effects! Free online support, upgrades and communities are in place to ensure you get the most out of your experience.
This video outlines the comparison between the recent Windows Vista and Ubuntu:
Ubuntu is also capable of running most* windows compatible software without problem using the free "WINE" application. It is also possible to set up a dual-boot system where the user chooses which operating system to boot into from a menu during startup.
Try Ubuntu RISK-FREE!
There are 3 ways to enjoy the rich, safe environment of the Ubuntu operating system:
1- Boot from the disc into a Live session to evaluate the operating system before you install it. No system changes are made at all so this process provides a risk-free assessment of the software.
2- Install Ubuntu from the disc to a harddrive on your computer (or laptop/notebook/netbook) either as a replacement or alongside other operating systems such as XP, Vista, Windows 7, MAC OS etc.
3- Run Ubuntu from within a "Virtual Machine" inside your own operating system, akin to an emulator (eg a Ubuntu desktop running as a program on a Windows XP machine). This method is not preferred as system performance and compatibility issues may arise due to the host softwares limitations.
Installing Ubuntu
To install Ubuntu (Latest Version) using one of the above methods, first download Ubuntu from this link>
http://www.ubuntu.com/getubuntu/download
Burn the image to a disc then boot from the disc and select the appropriate option from the menu (ie Install or Boot Live CD session).
11 January 2010
"Start Menu"
This tutorial by Redmistpete explains how to add GnoMenu which acts as a "Start Button" application to bunch all of your apps, settings, and launchers in one easy, eye-candy place.It can be tweaked with skins, icon sets, buttons and transparency as well as applying any open/close animation from the compiz-fusion library!
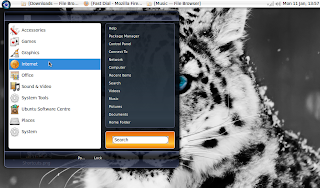
How to add GnoMenu
After Ubuntu 9.10 (Karmic), GnoMenu is pre-installed. If not, get the .deb package for GnoMenu v2.0 or above and install.
1- right-click the panel and select "Add to Panel..." (choose whichever panel you wish to place the Menu on - multiple instances are supported).
2- Scroll down and double-click "GnoMenu"
3- the menu can now be dragged to a convenient place on the panel (it may be necessary to 'unlock' any other items if they are in the way - just right click the and un-check the "Lock to Panel" box)
4- right clicking the GnoMenu icon allows configuration and locking it's position on the panel,
5- left-clicking the GnoMenu icon activates your new 'Start Menu'
'Terminal' improved
This tutorial by Redmistpete explains how to modify the terminal so that the background is tinted to a transparent black while the text is a striking bold white. This allows the terminal to be placed ontop of a webpage or document to copy the commands without obscuring the view - also it looks much better than the default and opaque black on white.

1- first, we'll open the standard terminal - go to 'Accessories>Terminal'
2- next, from the terminal's menu, we'll click 'Edit>Profile Preferences'
3- click 'Background' and select "Transparent Background" and move the slider to the right just past the center
4- Click colours and for "Text" I use 'white' and for "Background" I use 'black'
5- finally, just click 'Close'
9 January 2010
Cairo-Dock!
This tutorial by Redmistpete explains how to add Cairo-Dock which acts as a "Quick Launch" bar on the edge of the screen for the apps you use regularly. In addition, there are many docklet applications to add extra functionality such as an analogue clock, battery monitor (for laptops/netbooks), a weather monitor and a shortcut which displays regularly used devices and folders.
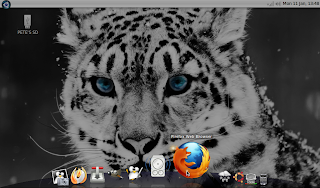
Add Cairo-Dock
1- open the Software Centre (or synaptic if you prefer) and install Cairo-Dock
2- open the session manager (startup programs) from the control centre and add "Cairo-Dock" so she starts up each time you reboot
3- launch Cairo-Dock from 'Accessories>GLX-Dock' (if your computer supports openGL rendering, otherwise click on the no_openGL_cairo-dock version instead)
"Shortcuts"
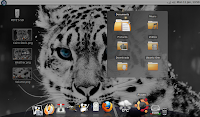
The shortcuts docklet allows the user to quickly jump to a desired device, drive or folder.
1- right-click the dock, go to 'Cairo-Dock>Configure' and put a tick in the 'Shortcuts' box in the 'Desktop' section
2- for neatness, I configured mine to display only folders (not drives or devices)
3- to make the docklet open when the mouse passes over the icon, remove the tick from "Open on Mouse Click" option
Volume Slider
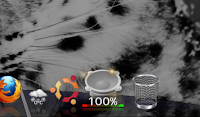
1- right-click the dock, go to 'Cairo-Dock>Configure' and put a tick in the 'Volume' box in the 'Controlers' section (it's French - forgive their spelling)
2- for neatness, I configured mine to display the %volume in the icon itself (rather than above the icon)
3- use the middle mouse wheel/touch-pad to slide the master volume up/down, right mouse-click opens the default sound-mixer
Weather Forecast

This docklet graphically displays the current weather and temperature. It can be expanded to show a short-forecast for the following number of days of your choice (the forecast is dependent on an internet connection and takes a moment to connect to the server after startup or reboot)
1- right-click the dock, go to 'Cairo-Dock>Configure' and put a tick in the 'Weather' box in the 'Accessories' section
2- to get a forecast, you need to ender you region code. US and Canada are automatically searched by entering a State but for UK, either search weather sites/google for your code or just experiment; UK codes will be in the format of either UKxx0001 or GBxx0001 and will run alphabetically by City
3- for neatness, I configured mine to display only 3 days in the forecast
22 May 2009
3D desktop effects
This tutorial by Redmistpete explains how to install CompizFuzion - a composite desktop environment, using Beryl and Compiz components, which integrates seamlessly with the normal desktop to enhance functionality and usability by adding effects, transitions and extra features which are not enabled by default.
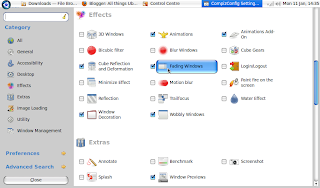
Installing CompizFuzion
In order for compiz to run at all there are several base packages (called dependencies) which must be installed (if you install Ubuntu 9.10 Karmic Koala or later, it is installed by default)
1- Open 'Synaptic Package Manager' and type admin password
2- Search for "compiz"
3- Check/install all of the following packages for installation:
compiz compiz-config-settings-manager
compiz-core
compiz-gnome
compiz-backend-gconf
compiz-fusion-plugins-main
compiz-fusion-plugins-extra
compiz-plugins
3- click 'Apply', click 'OK' to install
4- Once the packages are installed, open the sessions manager and create a new entry called something like "compiz" enter: "compiz --replace" as the command, click 'OK', click 'close' 5- log-out and log back in for compiz to take effect (it will now be enabled on each boot - to disable it, remove the "compiz" entry from the sessions manager and optionally uninstall the packages)
There are now many new features available to you - here are just some of the main functions: You can (and possibly will) spend hours playing with the various settings - admittedly, this can be confusing and/or frustrating if you just want it to work with minimum fuss. For ease I have included all my settings for how I like it but of course you can choose to set it up entirely how you wish:
Setting up Compiz:
The following setting are best applied using "CompizConfig Settings Manger" which is available as "CCSM" (Advanced Desktop Settings) from the task-launcher/application menu.
Enhanced Zoom Desktop [Enabled]
Allows the user to zoom in & out of all desktop content and follow the mouse pointer.
Desktop Cube [Enabled]
The desktop cube is a nice effect which gives you 4* desktops which, when activated, spin around in the form of a cube. As ell as looking pleasant, it has the function of providing a larger workspace which is divided into 4 distinct areas (*or as many or as few as you decide).
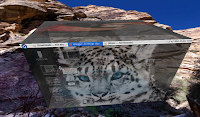
Skydome [Enable inside the Desktop Cube settings]
This places either a 360 degree image of your choice behind your desktop which becomes visible when you rotate the desktop cube. This is an awesome effect which creates the illusion that the desktops are floating in 3D space.
Fade to Desktop [Enabled]
When a predefined button is pressed (or hotspot mouse zone is hovered over), all windows fade out to reveal the desktop underneath - they return again on the second press.
Rotate Cube [Enabled]
This zooms out from the desktop and allows the user to freely/manually rotate the desktop cube, triangle, haxagon etc with the mouse. A custom background (either static or 3D panoramic "Skydome") is show in the background - very nice effect!
Widget Layer [Enabled]
When activated, the widgets are faded into view (clocks, calenders, task-bars, launchers, instruments, docks etc). I use mine to show/hide my quick-launch bar across the bottom of the screen with a fancy effect :D
Animation [Enabled]
Open, close, minimise, switch, move in style with transparencies, effects and animations such as fades and magic lamp and explode.
Cube Reflecion [Enabled]
Places a nice, subtle reflection whenever the cube is zoomed out.
Fading Windows [Enabled]
Adds a subtle fade effect when windows are manipulated in any way. Windows
Decoration [Enabled]
Allows skins to be used for the windows to give them a custom look or to emulate the feel of any other operating system.
Wobbly Windows [Enabled]
A gimmick which makes the windows wobble as you move them about - completely pointless but indispensable once you've seen it.
Windows Preview [Enabled]
This effect slides/fades in a preview of any open window when the mouse hovers over it on the task-bar/panel.
Animations
This option allows any components (be they a window, panel, gadget, launcher, browser etc) to be animated when they are opened/closed/shaded/minimised/focused etc - there are many animations to choose from, all of which can be tweaked to suit.
Widget Layer
This option allows any components (be they a window, panel, gadget, launcher, browser etc) to be displayed on a special 'layer' which can be switched on/off with a keypress or mouse hotspot. Transition effects can be added to make them fade/slide/drop in/out of the screen.
JPEG [Enabled]
PNG [Enabled]
SVG [Enabled]
TEXT [Enabled]
Cube Caps [Enabled]
This adds a picture (or picture slideshow) to the top and bottom surfaces of the cube which can be viewed by manually rotating the cube to one of these hidden faces. This can be handy when you leave your workstation, you can rotate the cube to the top face which could have a screen-shot of your desktop.
Regex Matching [Enabled]
Video Playback [Enabled]
Workarounds [Enabled]
Application Switcher [Enabled]
Quickly switches between all open applications using a visual slider
Extra WM Actions [Enabled]
I use this to quickly toggle full-screen view on/off
Place Widows [Enabled]
Put [Enabled]
Resize Window [Enabled]
Allows the user to resize windows using the familiar drag-bars
Shift Switcher [Enabled]
This uses a nice effect to quickly scroll through all open windows using cover-flow (like an iPods Cover-Flow) or a filing cabinet (just like Windows Vista stole from it)
Move Window [E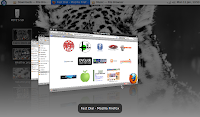 nabled]
All other settings [Disabled]

Installing CompizFuzion
In order for compiz to run at all there are several base packages (called dependencies) which must be installed (if you install Ubuntu 9.10 Karmic Koala or later, it is installed by default)
1- Open 'Synaptic Package Manager' and type admin password
2- Search for "compiz"
3- Check/install all of the following packages for installation:
compiz compiz-config-settings-manager
compiz-core
compiz-gnome
compiz-backend-gconf
compiz-fusion-plugins-main
compiz-fusion-plugins-extra
compiz-plugins
3- click 'Apply', click 'OK' to install
4- Once the packages are installed, open the sessions manager and create a new entry called something like "compiz" enter: "compiz --replace" as the command, click 'OK', click 'close' 5- log-out and log back in for compiz to take effect (it will now be enabled on each boot - to disable it, remove the "compiz" entry from the sessions manager and optionally uninstall the packages)
There are now many new features available to you - here are just some of the main functions: You can (and possibly will) spend hours playing with the various settings - admittedly, this can be confusing and/or frustrating if you just want it to work with minimum fuss. For ease I have included all my settings for how I like it but of course you can choose to set it up entirely how you wish:
Setting up Compiz:
The following setting are best applied using "CompizConfig Settings Manger" which is available as "CCSM" (Advanced Desktop Settings) from the task-launcher/application menu.
Enhanced Zoom Desktop [Enabled]
Allows the user to zoom in & out of all desktop content and follow the mouse pointer.
Desktop Cube [Enabled]
The desktop cube is a nice effect which gives you 4* desktops which, when activated, spin around in the form of a cube. As ell as looking pleasant, it has the function of providing a larger workspace which is divided into 4 distinct areas (*or as many or as few as you decide).

Skydome [Enable inside the Desktop Cube settings]
This places either a 360 degree image of your choice behind your desktop which becomes visible when you rotate the desktop cube. This is an awesome effect which creates the illusion that the desktops are floating in 3D space.
Fade to Desktop [Enabled]
When a predefined button is pressed (or hotspot mouse zone is hovered over), all windows fade out to reveal the desktop underneath - they return again on the second press.
Rotate Cube [Enabled]
This zooms out from the desktop and allows the user to freely/manually rotate the desktop cube, triangle, haxagon etc with the mouse. A custom background (either static or 3D panoramic "Skydome") is show in the background - very nice effect!
Widget Layer [Enabled]
When activated, the widgets are faded into view (clocks, calenders, task-bars, launchers, instruments, docks etc). I use mine to show/hide my quick-launch bar across the bottom of the screen with a fancy effect :D
Animation [Enabled]
Open, close, minimise, switch, move in style with transparencies, effects and animations such as fades and magic lamp and explode.
Cube Reflecion [Enabled]
Places a nice, subtle reflection whenever the cube is zoomed out.
Fading Windows [Enabled]
Adds a subtle fade effect when windows are manipulated in any way. Windows
Decoration [Enabled]
Allows skins to be used for the windows to give them a custom look or to emulate the feel of any other operating system.
Wobbly Windows [Enabled]
A gimmick which makes the windows wobble as you move them about - completely pointless but indispensable once you've seen it.
Windows Preview [Enabled]
This effect slides/fades in a preview of any open window when the mouse hovers over it on the task-bar/panel.
Animations
This option allows any components (be they a window, panel, gadget, launcher, browser etc) to be animated when they are opened/closed/shaded/minimised/focused etc - there are many animations to choose from, all of which can be tweaked to suit.
Widget Layer
This option allows any components (be they a window, panel, gadget, launcher, browser etc) to be displayed on a special 'layer' which can be switched on/off with a keypress or mouse hotspot. Transition effects can be added to make them fade/slide/drop in/out of the screen.
JPEG [Enabled]
PNG [Enabled]
SVG [Enabled]
TEXT [Enabled]
Cube Caps [Enabled]
This adds a picture (or picture slideshow) to the top and bottom surfaces of the cube which can be viewed by manually rotating the cube to one of these hidden faces. This can be handy when you leave your workstation, you can rotate the cube to the top face which could have a screen-shot of your desktop.
Regex Matching [Enabled]
Video Playback [Enabled]
Workarounds [Enabled]
Application Switcher [Enabled]
Quickly switches between all open applications using a visual slider

Extra WM Actions [Enabled]
I use this to quickly toggle full-screen view on/off
Place Widows [Enabled]
Put [Enabled]
Resize Window [Enabled]
Allows the user to resize windows using the familiar drag-bars
Shift Switcher [Enabled]
This uses a nice effect to quickly scroll through all open windows using cover-flow (like an iPods Cover-Flow) or a filing cabinet (just like Windows Vista stole from it)
Move Window [E
 nabled]
All other settings [Disabled]
19 May 2009
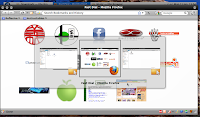
Mozilla Firefox and essential add-ons
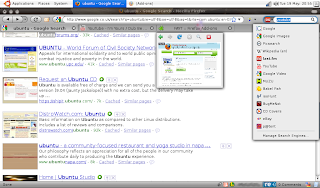
This tutorial by Redmistpete explains how to tweak the mozilla firefox browser to make it look better on the Eee PC and give it better functionality. Learn how to theme firefox and hide (toggle) the menu bar when not in use, disable annoying adverts and animations on web-pages, add customized functions and email notifiers, add all you favourite search-engines to one neat search-bar, use add-ons to download any streaming video or music and provide safer browsing.
note - firefox MUST BE restarted after installation for before these add-ons or themes can be used!
How to add the stylish Mac OSX 0.6.6 theme
How to install:
1- open firefox
2- click this link: https://addons.mozilla.org/en-US/firefox/addon/7172
3- click 'Add to Firefox'
4- click 'Install now'
5- click 'Restart Firefox'
How to use:
1- on the 'Menubar', click 'Tools', click 'Add-ons' ,click the 'Themes' tab
2- in themes, click "MacOSX 0.6.6", click 'Use Theme'
3- click 'Restart Firefox'
How to toggle the Menubar to "off" to save space and look neater
How to install:
1- open firefox
2- click this link: https://addons.mozilla.org/en-US/firefox/downloads/latest/4550/platform:2/addon-4550-latest.xpi?src=addondetail
3- click 'Add to Firefox'
4- click 'Install now'
5- click 'Restart Firefox'
How to use:
1- To select what you want to appear in the 'compact menu':
right-click an empty part of the 'Navigation toolbar' and click "Customize..."
put a check in the boxes of the items you want to appear
2- To toggle the 'Menubar' to 'off':
right-click an empty part of the 'Navigation toolbar', click "Menubar" and "Bookmarks Toolbar" to toggle them from "on" to "off"
3- To add a compact menu (optional):
right-click an empty part of the 'Navigation toolbar', click "Customize..."
drag the compact menu icon to a suitable location on your 'Navigation toolbar',
click 'done'
How to quickly jump to a specific word or phrase on a web-page
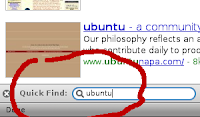
How to install:
1- open firefox
2- click this link: https://addons.mozilla.org/en-US/firefox/addon/3650
3- click 'Add to Firefox'
4- click 'Install now'
5- click 'Restart Firefox'
6- on the 'Menubar' click 'Edit', click 'Preferences', click 'Advanced', click 'General
7- put a check in the 'Search for Text when I Start Typing' box
8- click 'Close'
How to use:
1- navigate to an active web-page
2- type the word or phrase
How to improve the 'Stop' and 'Reload' buttons - two buttons become one
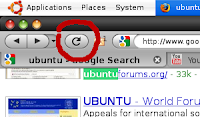
How to install:
1- open firefox
2- click this link: https://addons.mozilla.org/en-US/firefox/addon/313
3- click 'Add to Firefox'
4- click 'Install now'
5- click 'Restart Firefox'
6- right-click an empty part of the firefox 'Navigation toolbar', click 'Customize...'
7- make sure that both the 'Stop' and the 'Reload' buttons are dragged & dropped onto the 'Navigation toolbar' (this may already have been the case)
How to use:
This function is automatic - the button will be primarily be a 'Reload' button but will change to a 'Stop' button whenever a page is loading in!
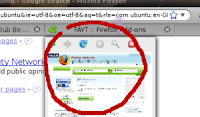
How to neaten up and remove unwanted buttons from the 'Navigation toolbar'
1- open firefox
2- right-click an empty part of the firefox 'Navigation toolbar', click 'Customize...'
3- put a check in 'Use small icons' box
5- rearrange buttons to the desired location by dragging and dropping
4- drag any buttons you don't want off from your task-bar
5- click 'Done'
How to add thumbnail previews to tabs
How to install:
1- open firefox
2- click this link: https://addons.mozilla.org/en-US/firefox/addon/6535
3- click 'Add to Firefox'
4- click 'Install now'
5- click 'Restart Firefox'
How to use:
This function is automatic - just move the pointer over a tab to see the thumbnail preview!
How to add all your search engines to one convenient location
How to install:
1- open firefox
2- click this link: https://addons.mozilla.org/en-US/firefox/addon/3682
3- click 'Add to Firefox'
4- click 'Install Now'
5- click 'Restart Firefox'
How to use:
1- To add a search engine
navigate to a page (such as www.ebay.co.uk)
right click in the websites search field, scroll down and click "Add to Search Bar
give it a name (such as eBay UK) or keep the default name and click 'OK'
2- How to use the search-bar
click the search-bar icons arrow (near the top right of the screen)
click the required search engine from the drop-down list
click the search window, type a search query, press 'Return'
3- How to manage/reorder the search engines
click the search-bar icons arrow (near the top right of the screen)
click 'Manage Search Engines...'
click a search engine, click 'Move Up' or 'Move Down' to suit
click 'OK' to finish
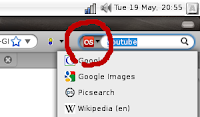
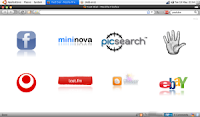
4- Useful Search engines:
www.google.com - major search engine
www.google.com/images - decent image search
www.picsearch.com - best image search
www.flikr.com - large, royalty-free image bank
www.wikipedia.com - huge user-uploaded image bank
www.last.fm - free streaming music
www.youtube.com - user uploaded videos
video.google.com - major video search engine
www.muzu.tv - free, high-quality music videos
www.babelfish.com - language translator
www.isohunt.com - torrent engine (music, software, pics etc.)
www.bugmenot.com - login username and password provider
www.play.com - online store (CDs, DVDs, Games etc.)
www.ebay.co.uk - online marketplace and auction
www.gb.espacent.com - search for patent information
www.192.com - find useful info (names and addresses etc.)
www.yell.com - online yellow pages and business directory
How to add convenient RSS feeds to the menu bar
1- right-click an empty part of the firefox 'Navigation toolbar'
2- check that 'Bookmarks Toolbar' is ticked
3- navigate to a page that supports RSS feed and click the RSS button to subscribe
4 - if more than one feed is available, you can select from a list which ones you want
5- the feeds are neetly added to the Bookmarks toolbar which can be clicked on
How to lookup information relating to a word or phrase with one click

How to install:
1- open firefox
2- click this link: https://addons.mozilla.org/en-US/firefox/addon/735
3- click 'Add to Firefox'
4- click 'Install Now'
5- click 'Restart Firefox'
How to use:
1- on a web-page, press and hold 'ctrl'
2- left-click a word or phrase
How to set your homepage with big favourite/bookmark buttons
How to Install:
1- open firefox
2- click this link: https://addons.mozilla.org/en-US/firefox/addon/5721
3- click 'Add to Firefox'
4- click 'Install Now'
5- click 'Restart Firefox'
How to Use:
1- How to add it as the home-page
press and hold 'ctrl' and press 't' to open a new 'Fast-Dial' tab
on the 'Menubar', click 'Edit', click 'Preferences', click the 'Use Current Page', click 'Close'
2- How to make it look better
in the 'Menubar', click 'Tools', click 'Addons', click 'Extensions', click 'Preferences', click 'Fast Dial', click 'Preferences', click "Appearance" 'Transparent Telega' click 'close'
3- How to add bookmarks to Fast Dial
right click web-page scroll down and click on 'Add to fast dial'
How to download streaming music and video
How to install:
1- open firefox
2- click this link: https://addons.mozilla.org/en-US/firefox/addon/3006
3- click 'Add to Firefox'
4- click 'Install Now'
5- click 'Restart Firefox'
How to Use:
1- navigate to a page with streaming music or video (eg: YouTube or Last.fm)
2- click on the little arrow next to the red, yellow and blue 'moving balls' icon
3- click the last entry in the list (eg: '128.mp3' or 'flaming_fists.flv')
4- enter a suitable file name (eg: 'The Prodigy - Warriors Dance.mp3')
5- choose a suitable download location (eg: Desktop), press return
6- some sites name mp3's as flv's, just rename them back to mp3 to play them
note- clicking the actual red, yellow and blue balls icon will list all compatible sites that have streaming video, there is a filter to turn content from adult sites 'on' or 'off'.
How to add a Web-mail notifier which instantly alerts you to new hotmail etc
How to install:
1- open firefox
2- click this link: https://addons.mozilla.org/en-US/firefox/addon/4490
3- click 'Add to Firefox'
4- click 'Install Now'
5- click 'Restart Firefox'
6- right-click an empty part of the firefox task-bar again and click 'Customize...'
7- drag & drop the 'email notifier' icon onto the 'Navigation toolbar'
8- click 'Done'
How to use:
1- right-click on the 'WebMail Notifier' icon
2- click 'Preferences...'
3- click 'WebMail Accounts'
4- click 'Daum' and select your webmail accounts protocol (eg: hotmail)
5- enter the accounts details (you must alredy have an active email account!)
6- click 'Add'
7- place a check in the 'Enable Auto Login' box
8- click on 'General' and change the settings to suit
9- click 'Close'
You will now be notified of new emails automatically!
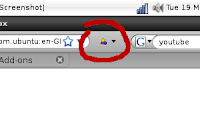
How to browse more safely - a small colour-coded icon is placed on links and websites to show their safety/reliability rating
How to install:
1- open firefox
2- click this link: https://addons.mozilla.org/en-US/firefox/addon/3456
3- click 'Add to Firefox'
4- click 'Install now'
5- click 'Restart Firefox'
How to Use:
1- How to remove the annoying 'Web Of Trust' logo
click the 'Web Of Trust' icon, click 'Settings'
on the 'Web Of Trust' website, click 'Advanced'
ucheck the 'Re-create the toolbar button if it gets removed...' box
on the 'Web Of Trust' website, click 'Apply Settings'
2- right-click an empty part of the 'Navigation toolar' and click 'Customize...'
3- drag & drop the 'Web Of Trust' icon off from the 'Navigation toolbar'
4- click 'Done'
Web-sites will now be automatically rated, you will be warned of high-risk sites!
How to remove unwanted adverts and pictures
How to install:
1- open firefox
2- click this link: https://addons.mozilla.org/en-US/firefox/addon/1865
3- click 'Add to Firefox'
4- click 'Install now'
5- click 'Restart Firefox'
How to Use:
1- open a web-page
2- right-click the offending advert or image, scroll down and click 'Adblock Frame', click 'Add Filter'
3- hit 'Refresh' - gone!!!
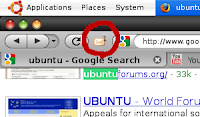
How to add neat little thumbnail previews of web-pages on google
How to install:
1- open firefox
2- click this link: https://addons.mozilla.org/en-US/firefox/addon/189
3- click 'Add to Firefox'
4- click 'Install now'
5- click 'Restart Firefox'
How to use:
This feature is automatic when you visit www.google.com
How to translate pages to any language with just one click!
How to install:
1- open firefox
2- click this link: https://addons.mozilla.org/en-US/firefox/addon/3361
3- click 'Add to Firefox'
4- click 'Install now'
5- click 'Restart Firefox'
How to Use:
1- open a web-page
2- right-click the 'Translator' icon, select a language
Other handy firefox tips
1- press 'ctrl' and 't' for a new tab (this also displays the homepage, if set)
2- double click the tab-bar for a new tab (this also displays the homepage, if set)
3- press 'ctrl' and 'n' for a new window
4- right clicking the 'Navigation toolbar' gives access to more toolbar options
From now on firefox will look cleaner and leaner, you will be able to see more of the web-page, browse and search quicker, safer and easier, be instantly notified of new emails, be able to download flash video's and streaming music and many basic functions will be more intuative!

How to add the stylish Mac OSX 0.6.6 theme
How to install:
1- open firefox
2- click this link: https://addons.mozilla.org/en-US/firefox/addon/7172
3- click 'Add to Firefox'
4- click 'Install now'
5- click 'Restart Firefox'
How to use:
1- on the 'Menubar', click 'Tools', click 'Add-ons' ,click the 'Themes' tab
2- in themes, click "MacOSX 0.6.6", click 'Use Theme'
3- click 'Restart Firefox'
How to toggle the Menubar to "off" to save space and look neater
How to install:
1- open firefox
2- click this link: https://addons.mozilla.org/en-US/firefox/downloads/latest/4550/platform:2/addon-4550-latest.xpi?src=addondetail
3- click 'Add to Firefox'
4- click 'Install now'
5- click 'Restart Firefox'
How to use:
1- To select what you want to appear in the 'compact menu':
right-click an empty part of the 'Navigation toolbar' and click "Customize..."
put a check in the boxes of the items you want to appear
2- To toggle the 'Menubar' to 'off':
right-click an empty part of the 'Navigation toolbar', click "Menubar" and "Bookmarks Toolbar" to toggle them from "on" to "off"
3- To add a compact menu (optional):
right-click an empty part of the 'Navigation toolbar', click "Customize..."
drag the compact menu icon to a suitable location on your 'Navigation toolbar',
click 'done'
How to quickly jump to a specific word or phrase on a web-page

How to install:
1- open firefox
2- click this link: https://addons.mozilla.org/en-US/firefox/addon/3650
3- click 'Add to Firefox'
4- click 'Install now'
5- click 'Restart Firefox'
6- on the 'Menubar' click 'Edit', click 'Preferences', click 'Advanced', click 'General
7- put a check in the 'Search for Text when I Start Typing' box
8- click 'Close'
How to use:
1- navigate to an active web-page
2- type the word or phrase
How to improve the 'Stop' and 'Reload' buttons - two buttons become one

How to install:
1- open firefox
2- click this link: https://addons.mozilla.org/en-US/firefox/addon/313
3- click 'Add to Firefox'
4- click 'Install now'
5- click 'Restart Firefox'
6- right-click an empty part of the firefox 'Navigation toolbar', click 'Customize...'
7- make sure that both the 'Stop' and the 'Reload' buttons are dragged & dropped onto the 'Navigation toolbar' (this may already have been the case)
How to use:
This function is automatic - the button will be primarily be a 'Reload' button but will change to a 'Stop' button whenever a page is loading in!
How to neaten up and remove unwanted buttons from the 'Navigation toolbar'
1- open firefox
2- right-click an empty part of the firefox 'Navigation toolbar', click 'Customize...'
3- put a check in 'Use small icons' box
5- rearrange buttons to the desired location by dragging and dropping
4- drag any buttons you don't want off from your task-bar
5- click 'Done'
How to add thumbnail previews to tabs

How to install:
1- open firefox
2- click this link: https://addons.mozilla.org/en-US/firefox/addon/6535
3- click 'Add to Firefox'
4- click 'Install now'
5- click 'Restart Firefox'
How to use:
This function is automatic - just move the pointer over a tab to see the thumbnail preview!
How to add all your search engines to one convenient location

How to install:
1- open firefox
2- click this link: https://addons.mozilla.org/en-US/firefox/addon/3682
3- click 'Add to Firefox'
4- click 'Install Now'
5- click 'Restart Firefox'
How to use:
1- To add a search engine
navigate to a page (such as www.ebay.co.uk)
right click in the websites search field, scroll down and click "Add to Search Bar
give it a name (such as eBay UK) or keep the default name and click 'OK'
2- How to use the search-bar
click the search-bar icons arrow (near the top right of the screen)
click the required search engine from the drop-down list
click the search window, type a search query, press 'Return'
3- How to manage/reorder the search engines
click the search-bar icons arrow (near the top right of the screen)
click 'Manage Search Engines...'
click a search engine, click 'Move Up' or 'Move Down' to suit
click 'OK' to finish
4- Useful Search engines:
www.google.com - major search engine
www.google.com/images - decent image search
www.picsearch.com - best image search
www.flikr.com - large, royalty-free image bank
www.wikipedia.com - huge user-uploaded image bank
www.last.fm - free streaming music
www.youtube.com - user uploaded videos
video.google.com - major video search engine
www.muzu.tv - free, high-quality music videos
www.babelfish.com - language translator
www.isohunt.com - torrent engine (music, software, pics etc.)
www.bugmenot.com - login username and password provider
www.play.com - online store (CDs, DVDs, Games etc.)
www.ebay.co.uk - online marketplace and auction
www.gb.espacent.com - search for patent information
www.192.com - find useful info (names and addresses etc.)
www.yell.com - online yellow pages and business directory
How to add convenient RSS feeds to the menu bar

1- right-click an empty part of the firefox 'Navigation toolbar'
2- check that 'Bookmarks Toolbar' is ticked
3- navigate to a page that supports RSS feed and click the RSS button to subscribe
4 - if more than one feed is available, you can select from a list which ones you want
5- the feeds are neetly added to the Bookmarks toolbar which can be clicked on
How to lookup information relating to a word or phrase with one click

How to install:
1- open firefox
2- click this link: https://addons.mozilla.org/en-US/firefox/addon/735
3- click 'Add to Firefox'
4- click 'Install Now'
5- click 'Restart Firefox'
How to use:
1- on a web-page, press and hold 'ctrl'
2- left-click a word or phrase
How to set your homepage with big favourite/bookmark buttons

How to Install:
1- open firefox
2- click this link: https://addons.mozilla.org/en-US/firefox/addon/5721
3- click 'Add to Firefox'
4- click 'Install Now'
5- click 'Restart Firefox'
How to Use:
1- How to add it as the home-page
press and hold 'ctrl' and press 't' to open a new 'Fast-Dial' tab
on the 'Menubar', click 'Edit', click 'Preferences', click the 'Use Current Page', click 'Close'
2- How to make it look better
in the 'Menubar', click 'Tools', click 'Addons', click 'Extensions', click 'Preferences', click 'Fast Dial', click 'Preferences', click "Appearance" 'Transparent Telega' click 'close'
3- How to add bookmarks to Fast Dial
right click web-page scroll down and click on 'Add to fast dial'
How to download streaming music and video

How to install:
1- open firefox
2- click this link: https://addons.mozilla.org/en-US/firefox/addon/3006
3- click 'Add to Firefox'
4- click 'Install Now'
5- click 'Restart Firefox'
How to Use:
1- navigate to a page with streaming music or video (eg: YouTube or Last.fm)
2- click on the little arrow next to the red, yellow and blue 'moving balls' icon
3- click the last entry in the list (eg: '128.mp3' or 'flaming_fists.flv')
4- enter a suitable file name (eg: 'The Prodigy - Warriors Dance.mp3')
5- choose a suitable download location (eg: Desktop), press return
6- some sites name mp3's as flv's, just rename them back to mp3 to play them
note- clicking the actual red, yellow and blue balls icon will list all compatible sites that have streaming video, there is a filter to turn content from adult sites 'on' or 'off'.
How to add a Web-mail notifier which instantly alerts you to new hotmail etc

How to install:
1- open firefox
2- click this link: https://addons.mozilla.org/en-US/firefox/addon/4490
3- click 'Add to Firefox'
4- click 'Install Now'
5- click 'Restart Firefox'
6- right-click an empty part of the firefox task-bar again and click 'Customize...'
7- drag & drop the 'email notifier' icon onto the 'Navigation toolbar'
8- click 'Done'
How to use:
1- right-click on the 'WebMail Notifier' icon
2- click 'Preferences...'
3- click 'WebMail Accounts'
4- click 'Daum' and select your webmail accounts protocol (eg: hotmail)
5- enter the accounts details (you must alredy have an active email account!)
6- click 'Add'
7- place a check in the 'Enable Auto Login' box
8- click on 'General' and change the settings to suit
9- click 'Close'
You will now be notified of new emails automatically!
How to browse more safely - a small colour-coded icon is placed on links and websites to show their safety/reliability rating

How to install:
1- open firefox
2- click this link: https://addons.mozilla.org/en-US/firefox/addon/3456
3- click 'Add to Firefox'
4- click 'Install now'
5- click 'Restart Firefox'
How to Use:
1- How to remove the annoying 'Web Of Trust' logo
click the 'Web Of Trust' icon, click 'Settings'
on the 'Web Of Trust' website, click 'Advanced'
ucheck the 'Re-create the toolbar button if it gets removed...' box
on the 'Web Of Trust' website, click 'Apply Settings'
2- right-click an empty part of the 'Navigation toolar' and click 'Customize...'
3- drag & drop the 'Web Of Trust' icon off from the 'Navigation toolbar'
4- click 'Done'
Web-sites will now be automatically rated, you will be warned of high-risk sites!
How to remove unwanted adverts and pictures
How to install:
1- open firefox
2- click this link: https://addons.mozilla.org/en-US/firefox/addon/1865
3- click 'Add to Firefox'
4- click 'Install now'
5- click 'Restart Firefox'
How to Use:
1- open a web-page
2- right-click the offending advert or image, scroll down and click 'Adblock Frame', click 'Add Filter'
3- hit 'Refresh' - gone!!!
How to add neat little thumbnail previews of web-pages on google

How to install:
1- open firefox
2- click this link: https://addons.mozilla.org/en-US/firefox/addon/189
3- click 'Add to Firefox'
4- click 'Install now'
5- click 'Restart Firefox'
How to use:
This feature is automatic when you visit www.google.com
How to translate pages to any language with just one click!
How to install:
1- open firefox
2- click this link: https://addons.mozilla.org/en-US/firefox/addon/3361
3- click 'Add to Firefox'
4- click 'Install now'
5- click 'Restart Firefox'
How to Use:
1- open a web-page
2- right-click the 'Translator' icon, select a language
Other handy firefox tips
1- press 'ctrl' and 't' for a new tab (this also displays the homepage, if set)
2- double click the tab-bar for a new tab (this also displays the homepage, if set)
3- press 'ctrl' and 'n' for a new window
4- right clicking the 'Navigation toolbar' gives access to more toolbar options
From now on firefox will look cleaner and leaner, you will be able to see more of the web-page, browse and search quicker, safer and easier, be instantly notified of new emails, be able to download flash video's and streaming music and many basic functions will be more intuative!

18 May 2009
Mount a PSP as Read-Writable device
This tutorial by Redmistpete explains how to make a Sony PSP automatically mount as a Read-Writable device each time it connects using Ubuntu - this overrides the default "read only" mount permission settings and will allow you to transfer data, game, music picture files to and from your PSP using Ubuntu instead of Windows ;)

Creating a Re/Writable automount
1- open a terminal
2- type: sudo mkdir /media/usb
3- enter your root password, press return
4- type: sudo gedit /etc/fstab
5- press return
6- add the following on a new line of text:
/dev/sda1 /mnt/usb auto rw,user,noauto 0 0
7- save and then exit
From now on, when you plug in the PSP, turn on and switch to USB mode it will automatically mount as Read/Writable and will automatically unmount when you disconnect the PSP!
Subscribe to:
Posts (Atom)